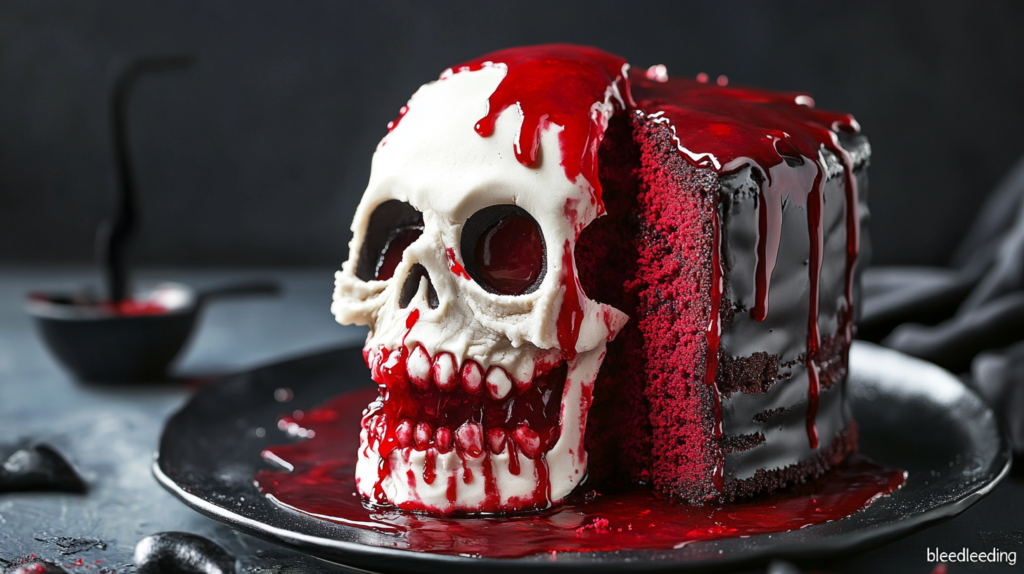
What is a bledding skull cake?
A bledding skull cake is a striking and spooky dessert that combines eerie visual appeal with delicious flavors, making it perfect for Halloween, horror-themed parties, or any creepy occasion. This cake gets its dramatic name from its gory appearance: a skull-shaped cake filled with a “bleeding” center that oozes red syrup or jam when sliced. The design mimics the effect of blood pouring from within, creating a chilling yet entertaining effect that captivates guests.
Typically made using a skull-shaped mold or sculpted by hand, the cake can be crafted from layers of sponge cake, filled with red-colored jams, fruit sauces, or ganache to create the “bleeding” effect. The exterior is often coated with fondant, buttercream, or chocolate to resemble the realistic look of a skull. Whether you’re aiming for a terrifyingly realistic or playfully spooky design, a bleeding skull cake is guaranteed to leave a lasting impression.
Why Choose a Bleeding Skull Cake for Spooky Occasions?
A bledding skull cake is the ultimate centerpiece for any spooky celebration. Here’s why it’s the perfect choice:
- Thrilling Visual Impact:
The “bleeding” effect when the cake is sliced creates a dramatic and interactive moment. Guests will be amazed as red syrup or jam oozes out, adding a spine-chilling surprise to the event. - Perfect for Themed Parties:
Whether it’s Halloween, a horror-themed birthday, or a movie night featuring scary films, the bleeding skull cake sets the tone and adds an element of fun and fright to the occasion. - Creative Customization:
This cake allows for creative freedom with decorations, fillings, and flavors. You can make it realistic with fondant detailing, a smooth chocolate skull, or add playful touches with colorful icing and candy eyes for a less frightening version. - Memorable Experience:
Guests of all ages will be entertained by the cake’s gory yet delicious nature. It’s not just a dessert—it’s an experience that people will talk about long after the party is over. - Tasty and Versatile:
Despite its spooky appearance, the bleeding skull cake can be made with any flavor combination—chocolate, vanilla, red velvet, or fruit-filled layers—appealing to a variety of tastes.
Choosing a bledding skull cake ensures your event has a bold, unforgettable centerpiece that is equal parts creepy and delicious!
Tools and Equipment You Need
To create a bledding skull cake, you’ll need some essential tools and equipment to ensure the design and bleeding effect are successful:
- Skull-Shaped Cake Mold:
- A skull cake pan or silicone mold will help achieve the shape without sculpting.
- Alternatively, you can bake regular layers and carve the skull shape by hand.
- Mixing Bowls:
- For mixing cake batter, fillings, and frosting.
- Electric Mixer:
- A stand or hand mixer will make creaming butter, mixing batter, and whipping fillings much easier.
- Cake Leveler or Serrated Knife:
- Used to level the cake layers or sculpt the cake into the desired skull shape.
- Piping Bags and Tips:
- For adding decorative details, such as frosting outlines, blood effects, or eye sockets.
- Spatula or Palette Knife:
- For spreading buttercream or ganache smoothly over the cake’s surface.
- Food Coloring:
- Red food coloring for creating the “blood” effect in jams, syrups, or ganache.
- Filling Ingredients:
- Red jam, fruit coulis, ganache, or syrup to create the oozing “blood.”
- Cake Board or Serving Platter:
- A sturdy base to display and transport your bleeding skull cake.
- Fondant or Modeling Chocolate (Optional):
- For creating realistic skull features or covering the cake for a smooth finish.
- Brushes and Edible Paints (Optional):
- For adding details like cracks, shadows, or blood smears on the skull for a realistic effect.
By having these tools and equipment on hand, you’ll be well-prepared to create a stunning, spooky, and realistic Bleeding Skull Cake that will be the highlight of any Halloween or horror-themed celebration!
Essential Baking Tools
To create a bledding skull cake, having the right tools is key to ensuring your cake turns out both spooky and delicious. Here are the essential baking tools you’ll need:
- Skull-Shaped Cake Pan or Mold:
- A silicone or metal skull cake mold helps create the perfect shape without sculpting.
- If you don’t have a mold, bake regular cake layers and carve the skull shape using a sharp knife.
- Mixing Bowls:
- Use large mixing bowls to prepare the cake batter, fillings, and frosting.
- Electric Mixer:
- A stand or handheld electric mixer makes creaming butter, whipping fillings, and mixing batter faster and easier.
- Measuring Cups and Spoons:
- Accurate measurements are key for baking success.
- Cake Leveler or Serrated Knife:
- Use this to level the cakes or carve the cake into the desired skull shape.
- Spatulas or Palette Knives:
- These tools are ideal for spreading frosting, buttercream, or ganache evenly over the cake.
- Piping Bags and Tips:
- Essential for adding decorative details like dripping blood, piping designs, or adding finishing touches.
- Cooling Rack:
- To cool the cake layers completely before assembling and decorating.
- Baking Spray or Parchment Paper:
- Prevents the cake from sticking to the pan or mold.
- Toothpicks or Skewers:
- To test if the cake is baked through and to secure layers during assembly, if necessary.
Decorative Supplies
To give your bledding skull cake its spooky and realistic appeal, you’ll need a few decorative supplies:
- Food Coloring:
- Red food coloring for creating the “blood” effect.
- Optional: Black or gray food coloring for realistic skull shading.
- Red Jam or Syrup:
- Strawberry, raspberry, or cherry jam creates the perfect oozing “blood” effect when the cake is sliced.
- Fondant or Modeling Chocolate (Optional):
- Use fondant to sculpt realistic skull features or cover the cake for a smooth, polished finish.
- White or off-white fondant works well for skulls.
- Edible Paints or Powder Dusts:
- For creating cracks, shadows, or aging effects on the skull surface.
- Edible Decorations:
- Candy eyes, chocolate shards, or edible glitter can be added for a dramatic or playful effect.
- Piping Gel:
- Great for enhancing the blood effect and creating a glossy, oozing appearance.
- Sprinkles or Sugar Crystals (Optional):
- Black, red, or silver sprinkles can add texture and a festive touch.
- Powdered Sugar:
- For light dusting or enhancing details like cracks in the skull.
Ingredients Required for a Perfect Bleeding Skull Cake
To bake a delicious and visually captivating bledding skull cake here’s a list of the essential ingredients:
For the Cake Base:
- All-Purpose Flour – 2 ½ cups (or self-raising flour, if preferred).
- Granulated Sugar – 1 ¾ cups for sweetness.
- Unsalted Butter – 1 cup (softened) to add moisture and richness.
- Eggs – 4 large eggs to bind and aerate the batter.
- Milk – 1 cup to achieve the perfect batter consistency.
- Baking Powder – 2 teaspoons (if using plain flour) to help the cake rise.
- Vanilla Extract – 2 teaspoons for a classic flavor.
- Cocoa Powder (Optional) – For a chocolate cake variation.
For the “Bleeding” Filling:
- Red Jam or Fruit Preserves – Strawberry, raspberry, or cherry jam works best.
- Red Food Coloring – A few drops to intensify the “bloody” look.
- Piping Gel or Corn Syrup (Optional) – Mixed with jam for a thicker, more realistic blood effect.
the Frosting or Coating:
- Buttercream Frosting – Made with butter, powdered sugar, milk, and vanilla extract.
- Fondant or Modeling Chocolate – White fondant for a smooth, realistic skull appearance.
- Chocolate Ganache (Optional) – For a rich and glossy coating.
For Decoration:
- Red Food Coloring – For creating dripping “blood” details.
- Edible Black Paint or Food Dust – For shading cracks and adding skull details.
- Candy Eyes or Edible Accessories (Optional) – For a fun, spooky touch.
With these tools, supplies, and ingredients, you’ll be well-prepared to create a bledding skull cake that looks terrifyingly realistic and tastes absolutely delicious. It’s the perfect combination of creepy and creative, sure to steal the show at any spooky occasion!
Ingredients for the Cake Base
To create the perfect bledding skull cake foundation, you need a soft, moist, and flavorful cake. Here are the essential ingredients for the base:
- All-Purpose Flour – 2 ½ cups
- Provides the structure for the cake. Use self-raising flour if skipping baking powder.
- Granulated Sugar – 1 ¾ cups
- Adds sweetness and moisture to the cake.
- Unsalted Butter – 1 cup (softened)
- Ensures a rich, buttery flavor and tender crumb.
- Eggs – 4 large eggs
- Acts as a binding agent while adding structure and fluffiness to the cake.
- Milk – 1 cup
- Keeps the cake moist and provides the right batter consistency.
- Baking Powder – 2 teaspoons
- Helps the cake rise and become light and fluffy.
- Vanilla Extract – 2 teaspoons
- Adds a classic and aromatic flavor.
- Cocoa Powder – ½ cup (optional for a chocolate variation)
- Use unsweetened cocoa powder if you prefer a spooky chocolate cake base.
Ingredients for the Bleeding Filling
The “bleeding” effect is the centerpiece of the cake, and it requires a vibrant red filling that oozes realistically when sliced. Here are the ingredients:
- Red Jam or Fruit Preserves – 1 cup
- Strawberry, raspberry, or cherry jam works best for a rich red color and slightly tangy flavor.
- Red Food Coloring – A few drops
- Intensifies the red color of the jam or syrup for a blood-like appearance.
- Corn Syrup or Piping Gel (optional) – 2 tablespoons
- Mix with jam to achieve a glossy and thicker oozing effect.
- Optional Flavor Additions:
- A few drops of lemon juice (for tanginess) or vanilla extract for added depth of flavor.
Ingredients for Skull Decoration
To achieve the eerie and realistic skull appearance, you’ll need the following decoration ingredients:
- Fondant or Modeling Chocolate – 1 to 2 pounds (white or ivory color)
- Use to cover the cake and create a smooth, skull-like exterior. Fondant works well for detailed sculpting.
- Buttercream Frosting – 2 cups
- Made with unsalted butter, powdered sugar, milk, and vanilla extract. Use as a crumb coat under the fondant or for a buttercream skull alternative.
- Red Food Coloring or Edible Paint – A few drops
- Use to create dripping blood effects or highlight realistic details like cracks and shadows.
- Black Food Coloring or Edible Dust – Small amount
- Adds shading for cracks, eye sockets, or skull contours for a spooky, aged look.
- Powdered Sugar (optional) – 1 tablespoon
- Lightly dust to add texture or highlight skull features.
- Candy Eyes or Edible Accessories (optional):
- Add fun or creepy embellishments, such as candy eyeballs or edible glitter for a playful finishing touch.
- Chocolate Ganache or Melted Chocolate (optional):
- For a smooth, rich coating on the skull or added dripping details.
With these detailed ingredients for the cbledding skull cake , and skull decoration, you’ll be fully prepared to create a stunning Bleeding Skull Cake that combines spine-chilling visuals with delicious flavors—a true showstopper for any spooky celebration!

FAQs About the Bleeding Skull Cake
1. What is a Bleeding Skull Cake?
A bledding skull cake is a spooky and dramatic dessert designed to resemble a skull with a “bleeding” effect. The cake is typically shaped like a skull, filled with red jam, syrup, or ganache that oozes out like blood when the cake is sliced. This makes it a perfect centerpiece for Halloween parties, horror-themed events, or any occasion where a spooky dessert is desired.
2. How do you make the cake “bleed”?
To achieve the bleeding effect:
- Bake and shape the skull cake using a skull mold or by carving a basic round cake.
- Cut a cavity in the center of the cake or between layers.
- Fill the cavity with red jam, fruit preserves, or a mixture of corn syrup and red food coloring for a thicker, oozing effect.
- Seal the filling with cake crumbs or frosting, then assemble the cake.
When sliced, the filling flows out, mimicking realistic “blood.”
3. Can I make a bledding skull cake without a skull mold?
Yes, you can make a Bleeding Skull Cake without a skull mold:
- Carve the Skull: Bake a standard round or rectangular cake, and carefully carve it into a skull shape using a serrated knife.
- Layer the Cake: Stack multiple cake layers to create height, then carve the facial details like eye sockets and jawlines.
- Decorate with Fondant or Frosting: Use fondant or buttercream to refine the shape and add details like cracks or blood effects.
While a skull mold simplifies the process, hand-carving allows for a more creative, customized look.
4. What kind of filling works best for the bleeding effect?
The best fillings for a bledding skull cake effect are ones with a smooth, thick consistency and a deep red color:
- Red Jam or Fruit Preserves: Strawberry, raspberry, or cherry jam gives a natural, vibrant red color.
- Corn Syrup + Red Food Coloring: This mixture creates a glossy, realistic “blood” effect that flows well.
- Red Ganache: Melt white chocolate and tint it red for a rich, creamy blood-like filling.
- Red Gel Icing: Pre-made gel icing works well for an easy, thick bleeding effect.
You can even combine these for a unique texture and flavor.
5. Can I make the Bleeding Skull Cake in advance?
Yes, you can prepare a Bleeding Skull Cake in advance:
- Bake the Cake: Bake the cake layers or skull mold and store them tightly wrapped for up to 2 days at room temperature or freeze for longer storage.
- Prepare the Filling: Make the bleeding filling (jam, syrup, or ganache) ahead of time and refrigerate it.
- Assemble Before Serving: Add the filling and final decorations on the day of the event to keep the cake fresh and maintain the oozing effect when sliced.
6. What flavors work well for a Bleeding Skull Cake?
While the visual theme is spooky, you can use delicious flavors for the cake and filling:
- Classic Vanilla: A light and fluffy vanilla cake pairs well with the red jam filling.
- Rich Chocolate: A dark chocolate cake adds drama and a decadent flavor.
- Red Velvet: Its deep red color complements the bleeding theme perfectly.
- Spice Cake: Warm spices like cinnamon and nutmeg add a fall-inspired twist for Halloween.
You can customize the cake flavor and filling based on your preferences and event theme.
7. How do I make the skull look realistic?
To make the skull look realistic:
- Use Fondant or Modeling Chocolate: Cover the cake with smooth fondant or modeling chocolate for a polished finish.
- Add Shadows and Cracks: Use edible black food dust or paint to create shadows in the eye sockets, nose, and jawline. Add cracks or aging details for a spooky effect.
- Create Blood Drips: Use red gel icing or syrup to create realistic blood drips on the skull’s surface.
- Texture with Tools: Use a sculpting tool, brush, or toothpick to add texture or rough edges to the skull.
8. Can I make this cake kid-friendly?
Yes! To make the Bleeding Skull Cake more playful and less scary for kids:
- Use bright, fun colors like red, purple, or green for decorations.
- Add candy eyes or a goofy face instead of realistic features.
- Opt for a simpler filling, like strawberry jam, and focus on fun drips and designs.
- Decorate with colorful sprinkles or edible glitter to make it festive.
This way, the cake retains its spooky theme but becomes less intense and more suitable for children.
A Bleeding Skull Cake is the ultimate combination of creativity, spooky fun, and delicious flavor, making it an unforgettable dessert for any eerie occasion! 🎃
1 https://recipes4hub.com/butterfly-cupcakes-recipe-perfect-for-every-occasion/
2 https://recipes4hub.com/easy-non-alcoholic-aperol-spritz-recipe-for-any-occasion/
3 https://recipes4hub.com/best-creme-brulee-recipe-with-milk-silky-perfection-awaits/


