Introduction to Cherry Flavored Hardening Cookie Glaze
What Is Cherry Flavored Hardening Cookie Glaze?
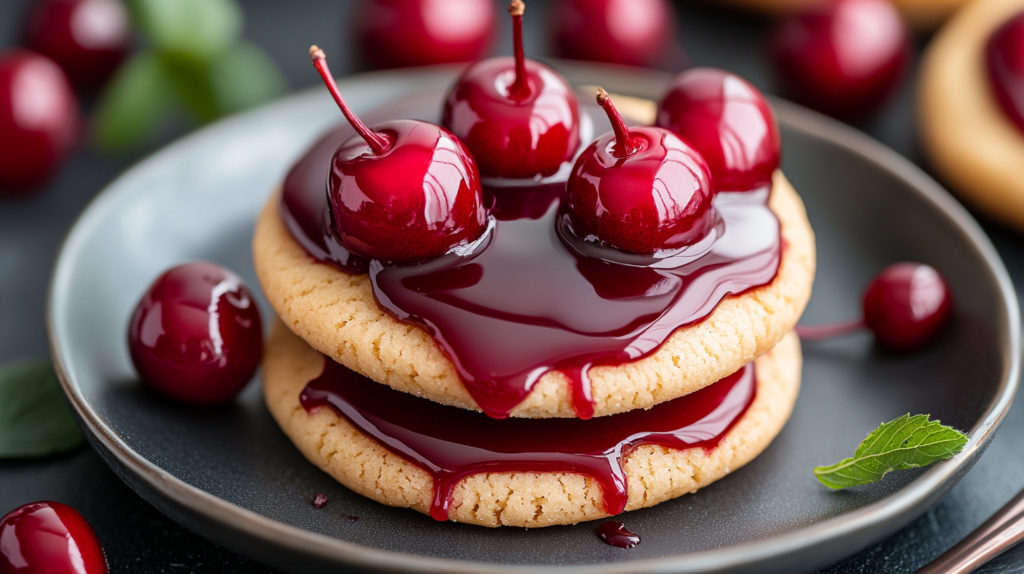
Cherry Flavored Hardening Cookie Glaze is a sweet and flavorful icing designed to enhance both the appearance and taste of cookies. This glaze combines the bold, fruity essence of cherry with a glossy finish that hardens upon drying, making it perfect for decorating cookies with intricate designs or adding a vibrant pop of color.
Why It’s a Game-Changer for Cookie Decorating
This glaze stands out for its ability to balance aesthetics and practicality. Its smooth, shiny finish dries firm to the touch, preventing smudges and allowing for easy stacking and storage. The addition of cherry flavor elevates the cookies with a burst of fruity sweetness, making them as delicious as they are beautiful.
The Perfect Blend of Flavor and Function
Cherry Flavored Hardening Cookie Glaze offers the best of both worlds. It’s easy to work with, creating a smooth application for decorating, while its rich cherry flavor complements the cookie base without being overpowering. Whether used for holiday treats, themed parties, or everyday baking, this glaze transforms cookies into edible works of art.
Key Ingredients for Cherry Flavored Cookie Glaze
Selecting the Right Cherry Flavoring
To achieve the perfect cherry flavor, choose high-quality flavorings:
- Cherry Extract: A concentrated option that provides a robust cherry flavor with minimal liquid addition.
- Cherry Syrup: Adds both flavor and sweetness but may require adjusting the sugar content.
- Natural Cherry Juice: Offers a subtle, fruity taste but may affect the glaze’s consistency and drying time.
Essential Components for a Glossy, Hard Finish
The following ingredients are crucial for creating a smooth, glossy glaze that hardens well:
- Powdered Sugar: Forms the base of the glaze, providing sweetness and structure.
- Milk or Water: Helps achieve the desired consistency for spreading or piping.
- Light Corn Syrup: Adds shine and helps the glaze harden evenly.
- Cherry Flavoring: Infuses the glaze with a vibrant, fruity taste.
- Food Coloring (Optional): Enhances the glaze’s visual appeal with a cherry-red hue.
Ingredient Substitutions for Dietary Needs
For those with specific dietary restrictions, consider these alternatives:
- Dairy-Free Option: Replace milk with almond milk, oat milk, or water for a vegan-friendly glaze.
- Corn Syrup Substitute: Use agave syrup or honey as a natural alternative, though it may slightly affect the hardening process.
- Sugar-Free Version: Use powdered erythritol or another sugar substitute to create a glaze suitable for low-sugar or keto diets.
By combining the right ingredients and tailoring them to your needs, you can create a versatile and delicious Cherry Flavored Hardening Cookie Glaze that elevates any cookie-baking experience.
Equipment Needed for Perfect Glaze Application
Tools for Mixing and Application
To create and apply Cherry Flavored Hardening Cookie Glaze, these tools are essential:
- Mixing Bowl: For combining the glaze ingredients smoothly.
- Whisk or Spoon: For mixing and ensuring a lump-free texture.
- Piping Bags or Bottles: Ideal for precise application and intricate designs.
- Spatula or Knife: For spreading the glaze evenly over the cookie surface.
- Toothpicks: Useful for adding fine details or popping air bubbles in the glaze.
Alternatives to Professional Baking Tools
If you don’t have professional baking tools on hand, try these substitutions:
- Piping Bags: Use a zip-top bag with a small corner snipped off.
- Mixing Bowl: Any clean, deep bowl will work, even if it’s not specifically for baking.
- Piping Bottles: Squeeze bottles for condiments can double as glaze applicators.
- Spatula: A butter knife or the back of a spoon can work for spreading glaze.
Tips for Easy Cleanup
Decorating cookies can be messy, but these tips make cleanup easier:
- Use Parchment Paper: Place parchment paper under cookies to catch drips.
- Separate Work Areas: Keep a designated spot for glaze mixing and application.
- Warm Water Rinse: Soak tools in warm water immediately after use to prevent glaze from hardening.
- Disposable Bags: Use disposable piping bags for minimal cleanup.
Step-by-Step Recipe for Cherry Flavored Hardening Cookie Glaze
Measuring Ingredients with Precision
- Gather Ingredients:
- 2 cups powdered sugar
- 3 tablespoons milk or water
- 1 tablespoon light corn syrup
- 1 teaspoon cherry extract
- Red food coloring (optional)
- Measure Accurately: Use dry measuring cups for powdered sugar and liquid measuring cups for milk or water to ensure proper consistency.
Creating the Cherry Flavored Glaze Base
- Combine Ingredients: In a mixing bowl, whisk together the powdered sugar, milk or water, and corn syrup until smooth.
- Add Flavor: Stir in the cherry extract to infuse the glaze with fruity flavor.
- Adjust Consistency: Add more milk or water, one teaspoon at a time, for a thinner glaze, or additional powdered sugar for a thicker consistency.
Techniques for Achieving the Perfect Consistency
- Run-Test Method: Drip a small amount of glaze from a spoon. It should flow smoothly but hold its shape for 5–10 seconds before flattening.
- For Piping: Ensure the glaze is slightly thicker to hold details when applied.
- For Flooding: Thin the glaze slightly to allow it to spread evenly across the cookie surface.
- Check Drying Time: Let a small test patch dry for a few minutes to confirm it hardens properly.
With these steps, tools, and tips, you can master the art of making and applying Cherry Flavored Hardening Cookie Glaze, turning ordinary cookies into stunning, flavorful creations.
Application Techniques
Preparing Cookies for Glazing
- Cool Completely: Ensure cookies are fully cooled before applying the glaze to prevent melting or running.
- Smooth the Surface: Brush off any crumbs or uneven edges to create a clean base for the glaze.
- Set Up a Workspace: Arrange cookies on a wire rack with parchment paper underneath to catch drips.
Best Methods for Applying the Glaze
- Piping and Flooding:
- Use a piping bag to outline the cookie with a slightly thicker glaze.
- Fill in the center with a thinner glaze, allowing it to spread evenly.
- Use a toothpick to smooth out edges or create intricate designs.
- Dipping:
- Dip the top of the cookie directly into the glaze, then gently shake off excess.
- Let the glaze settle and harden for a smooth, glossy finish.
- Brush-On Technique:
- Use a pastry brush to apply a thin, even coat for a light glaze effect.
Troubleshooting Uneven Coating
- Lumps or Air Bubbles: Stir the glaze thoroughly and pop bubbles with a toothpick or tap the bowl lightly on a counter.
- Running or Pooling: Check the glaze consistency; thicken with more powdered sugar or let it set slightly before applying.
- Streaks or Uneven Color: Mix the glaze well to ensure the cherry flavor and coloring are evenly distributed.
Customizing Your Glaze
Adjusting Cherry Intensity and Sweetness
- For More Cherry Flavor: Add an extra 1/4 teaspoon of cherry extract or a few drops of cherry syrup. Taste as you go to avoid overpowering the glaze.
- For Balanced Sweetness: Use a pinch of salt or a drop of lemon juice to counteract excessive sweetness.
Adding Colors for Festive Themes
- Holiday Themes: Use red and green food coloring for Christmas, pastel shades for Easter, or vibrant hues for birthdays.
- Layered Designs: Apply one color as a base, let it dry, then add additional colors or patterns on top for intricate effects.
- Shimmer Effects: Sprinkle edible glitter or luster dust over the wet glaze for a festive sparkle.
Infusing Additional Flavors for a Gourmet Touch
- Citrus Kick: Add a few drops of orange or lemon extract for a complementary fruitiness.
- Almond or Vanilla Notes: Mix in a small amount of almond or vanilla extract for added depth.
- Spices and Herbs: Incorporate ground cinnamon, nutmeg, or a hint of fresh basil for unique flavor profiles.
By mastering these techniques and customizations, you can create stunning, delicious cookies with Cherry Flavored Hardening Cookie Glaze tailored to any occasion or personal preference.
Drying and Hardening Process
How Long Does It Take for the Glaze to Harden?
The drying time for Cherry Flavored Hardening Cookie Glaze depends on the thickness of the glaze and environmental factors. Typically, it takes:
- 1 to 2 hours for the glaze to become firm to the touch.
- 6 to 12 hours for the glaze to fully harden and set completely.
If you’re in a hurry, consider adjusting the glaze’s consistency for faster drying times.
Environmental Factors That Affect Drying
Several factors can influence how quickly the glaze hardens:
- Humidity: High humidity slows down the drying process, while dry air helps the glaze set more quickly.
- Temperature: Warmer environments speed up drying, so placing cookies in a cool, dry room will help the glaze set properly.
- Airflow: Good ventilation or using a fan can speed up the drying process, but avoid direct drafts which may cause uneven drying.
Speeding Up the Process Safely
To safely speed up the drying process:
- Use a Fan: Place cookies under a fan or in front of an open window to enhance air circulation.
- Avoid Using the Oven: While tempting, placing cookies in the oven can cause uneven drying or soften the glaze.
- Thin the Glaze: Apply a thinner layer of glaze to each cookie to reduce drying time.
Common Mistakes to Avoid
Overmixing or Undermixing Ingredients
- Overmixing: If you overmix the glaze, it can become too runny and difficult to apply. Mix just enough to combine all the ingredients without overworking the glaze.
- Undermixing: Failing to mix the glaze thoroughly can result in uneven texture or lumps. Always stir the ingredients well to achieve a smooth and consistent glaze.
Using the Wrong Type of Cherry Flavoring
- Artificial Cherry Flavoring: Some cherry flavorings may have a synthetic aftertaste, which can detract from the overall quality of the glaze. Use pure cherry extract or a high-quality cherry syrup for the best flavor.
- Incorrect Ratio: Using too much cherry flavoring can overpower the sweetness of the glaze. Add small amounts at a time and taste as you go to achieve the right balance.
Storing Glazed Cookies Incorrectly
- Storing Before Fully Dry: If you store cookies before the glaze is completely set, the glaze may smear or lose its shiny finish. Allow the glaze to dry fully before stacking or storing.
- Improper Containers: Store glazed cookies in an airtight container at room temperature. If you stack them, place parchment paper between layers to prevent sticking.
- Humidity Exposure: Avoid storing cookies in overly humid environments, as this can cause the glaze to soften or become tacky.
By being mindful of these drying, hardening, and preparation tips, you can achieve perfectly glazed cookies that are both beautiful and delicious every time.
External Resources and Links
Where to Buy Premium Cherry Flavoring and Ingredients
High-quality cherry flavoring and other ingredients are essential for making the perfect hardening cookie glaze. Here are some trusted sources:
- Specialty Baking Stores: Local baking supply stores often carry premium flavorings and fresh ingredients.
- Online Retailers:
- Nuts.com: Offers a variety of baking essentials, including cherry extract and powdered sugar.
- Amazon: A convenient option for finding cherry flavoring, light corn syrup, and food coloring.
- King Arthur Baking: Features high-quality baking ingredients and tools.
- Gourmet Food Stores: Look for organic or natural cherry flavorings at stores like Whole Foods or Sprouts.
Links to Related Baking Guides and Recipes
Expand your baking repertoire with these helpful guides and recipes:
- Royal Icing vs. Glaze: Learn the differences and when to use each at The Kitchn.
- Cookie Decorating Tips: Explore beginner-friendly techniques at Wilton.
- Flavor-Infused Glazes: Discover unique flavor combinations for glazes at Serious Eats.
- Classic Sugar Cookies: Pair your cherry glaze with the perfect sugar cookie base from AllRecipes.
Conclusion
The Versatility of Cherry Flavored Hardening Cookie Glaze
Cherry Flavored Hardening Cookie Glaze is a game-changer in the world of cookie decorating. Its glossy finish, delightful cherry flavor, and firm texture make it a versatile option for various occasions—from simple family treats to elegant party favors. Whether you’re creating festive holiday cookies or adding a gourmet touch to a classic recipe, this glaze enhances both the flavor and visual appeal of your baked goods.
Encouragement to Experiment and Share Your Creations
Now that you have the tools and techniques, it’s time to unleash your creativity! Experiment with colors, flavors, and designs to make the glaze uniquely your own. Whether you’re preparing cookies for a celebration or as a thoughtful gift, share your creations with loved ones and inspire others to explore the versatility of cherry-flavored cookie glaze. Happy baking!


