Understanding Convection Ovens
What is a Convection Oven?
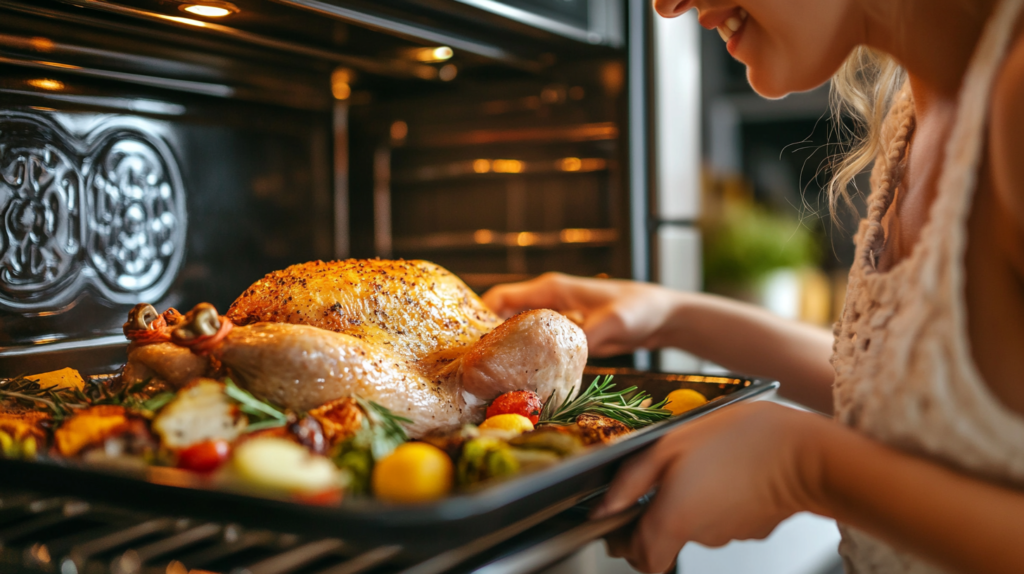
Cooking a turkey in a convection oven is a game-changer, thanks to its innovative design that features a fan and exhaust system to circulate hot air evenly throughout the cooking chamber. This consistent heat distribution ensures faster and more even cooking, making convection ovens a popular choice for baking, roasting, and reheating with precision and efficiency.
How It Differs from Conventional Ovens
The key difference between convection and conventional ovens lies in heat distribution:
- Convection Ovens:
- Use a fan and exhaust system to circulate air, ensuring even heat across the entire cooking area.
- Maintain consistent temperatures, reducing the need for rotation or repositioning of food.
- Conventional Ovens:
- Rely on natural heat flow from heating elements (top and/or bottom), which can create uneven cooking or hot spots.
- May require longer cooking times and more attention to ensure even results.
Advantages of Using Convection Ovens for Roasting
- Even Cooking:
- The circulating air ensures that food is roasted uniformly, preventing overcooking or undercooking.
- Reduced Cooking Time:
- Convection ovens cook food faster, cutting cooking time by approximately 25% compared to conventional ovens.
- Enhanced Texture:
- The air circulation removes moisture from the surface, creating a crispy exterior while retaining juiciness inside.
- Energy Efficiency:
- Faster cooking means less energy consumption, making convection ovens an eco-friendly choice.
Why Choose a Convection Oven for Turkey?
Even Heat Distribution
Convection ovens are ideal for roasting turkey because of their ability to distribute heat evenly. This ensures:
- The entire turkey, from the thick breast meat to the thinner wings and legs, cooks consistently.
- No need for constant monitoring or rotating the turkey to avoid uneven cooking.
Faster Cooking Times
Convection ovens reduce cooking times significantly, making them convenient for large meals like turkey:
- A whole turkey typically cooks 25–30% faster in a convection oven compared to a conventional oven.
- This allows you to spend less time waiting and more time enjoying your meal.
Crispy Skin and Juicy Meat Benefits
One of the standout advantages of using a convection oven for turkey is the superior texture:
- Crispy Skin:
- The circulating air removes excess surface moisture, allowing the skin to become golden and crispy.
- Juicy Meat:
- While the exterior crisps up, the convection process locks in the turkey’s natural juices, resulting in tender and flavorful meat.
Pro Tip: Start roasting at a higher temperature (around 425°F) for the first 20–30 minutes, then reduce to 325°F to ensure crispy skin and evenly cooked meat.
Using a convection oven for turkey not only saves time but also guarantees a beautifully roasted bird with crispy skin and juicy meat, making it a top choice for holiday feasts and family gatherings.
Preparing Your Turkey for the Oven
Selecting the Perfect Turkey
Choosing the right turkey is the first step to a successful roast:
- Size Matters:
- Plan for about 1 to 1.5 pounds of turkey per person to ensure enough servings and leftovers.
- Fresh vs. Frozen:
- Fresh turkeys: Offer better texture and flavor but require same-day or next-day cooking.
- Frozen turkeys: Convenient and widely available but require proper thawing.
- Organic or Free-Range Options:
- Consider organic or free-range turkeys for higher quality and more natural flavor.
Thawing Guidelines and Safety Tips
Properly thawing a turkey ensures even cooking and prevents foodborne illnesses:
- Refrigerator Thawing:
- Place the turkey on a tray to catch drips and thaw in the fridge.
- Allow 24 hours for every 4–5 pounds of turkey.
- Cold Water Thawing:
- Submerge the turkey in cold water, changing the water every 30 minutes.
- Thawing time: 30 minutes per pound.
- Safety Tips:
- Never thaw at room temperature to avoid bacterial growth.
- Cook the turkey immediately after thawing in cold water.
Cleaning and Seasoning the Turkey
- Cleaning the Turkey:
- Remove the giblets and neck from the cavity.
- Rinse the turkey inside and out under cold water, then pat dry with paper towels.
- Seasoning the Turkey:
- Dry Brining: Rub the turkey with a mixture of salt, herbs, and spices, and refrigerate uncovered for 12–24 hours for enhanced flavor and moisture retention.
- Wet Brining: Soak the turkey in a saltwater solution with added herbs and spices for 12–24 hours before cooking.
- Simple Seasoning: Rub with olive oil or butter and sprinkle with salt, pepper, and your choice of herbs (e.g., thyme, rosemary, sage).
Pro Tip: Season under the skin for deeper flavor.
Essential Tools and Equipment
Roasting Pans and Racks
- Roasting Pan:
- A sturdy, deep roasting pan holds the turkey and catches drippings for gravy.
- Roasting Rack:
- Elevates the turkey, allowing heat to circulate evenly and preventing soggy skin on the underside.
Pro Tip: If you don’t have a roasting rack, use vegetables like carrots, onions, and celery as a natural rack.
Meat Thermometers
- Instant-Read Thermometer:
- Provides quick temperature readings to ensure the turkey is cooked to perfection.
- Probe Thermometer:
- Monitors the turkey’s internal temperature throughout the cooking process without opening the oven.
Pro Tip: Check the temperature in the thickest part of the breast (165°F) and the thigh (170°F–175°F).
Optional Accessories for Perfect Turkey Cooking
- Basting Brush or Bulb:
- Helps keep the turkey moist by applying drippings, butter, or broth during cooking.
- Foil or Butcher Paper:
- Covers the turkey to prevent over-browning or drying during extended roasting.
- Gravy Separator:
- Separates fat from drippings for smooth, flavorful gravy.
- Kitchen Twine:
- Used for trussing the turkey, ensuring even cooking and a neat appearance.
Pro Tip: Having the right tools on hand not only simplifies the cooking process but also ensures your turkey turns out perfectly roasted, juicy, and flavorful.
Temperature Settings and Timing
Recommended Cooking Temperatures
Cooking your turkey at the right temperature ensures even cooking and prevents dryness:
- Convection Oven: Set the temperature to 325°F for most turkeys.
- Higher Temperature Start: For crispy skin, start at 400°F–425°F for the first 20–30 minutes, then reduce to 325°F for the remainder of the cooking time.
Pro Tip: Always use a meat thermometer to check doneness. The internal temperature should reach:
- 165°F in the breast.
- 170°F–175°F in the thickest part of the thigh.
Average Cooking Times Per Pound
Convection ovens cook faster due to circulating hot air. Use the following guidelines:
- Unstuffed Turkey:
- 10–12 pounds: 1.5–2 hours.
- 12–16 pounds: 2–2.5 hours.
- 16–20 pounds: 2.5–3 hours.
- 20–24 pounds: 3–3.5 hours.
- Stuffed Turkey:
- Add an extra 30 minutes to the total cooking time, as the stuffing takes longer to reach a safe temperature (165°F).
Pro Tip: Plan for about 10–12 minutes per pound for unstuffed and 12–15 minutes per pound for stuffed turkeys.

Adjusting for Stuffed vs. Unstuffed Turkeys
- Unstuffed Turkeys:
- Cook faster and more evenly. Ideal if you prefer to bake stuffing separately.
- Stuffed Turkeys:
- Take longer to cook because the stuffing must also reach 165°F for food safety.
- Avoid overpacking the cavity to ensure proper heat circulation.
Pro Tip: For stuffed turkeys, insert a thermometer into the center of the stuffing to confirm doneness.
The Step-by-Step Process of Cooking a Turkey in a Convection Oven
Preheating the Oven
- Set the Temperature:
- Preheat the convection oven to 325°F.
- For crispy skin, preheat to 400°F–425°F before lowering the temperature.
- Prepare the Turkey:
- Place the turkey on a roasting rack in a pan, breast-side up, and season as desired.
Positioning the Turkey
- Center of the Oven:
- Position the turkey in the middle rack to allow even airflow around the bird.
- Legs Towards the Heat Source:
- In some convection ovens, the heat source is at the back. Position the legs facing this area, as they require longer cooking.
- Tent with Foil (Optional):
- To prevent over-browning, loosely cover the turkey with foil during the first half of cooking. Remove for the last 30–40 minutes for crispy skin.
Monitoring Cooking Progress
- Check Temperature Regularly:
- Insert a meat thermometer into the thickest part of the breast and thigh without touching the bone.
- Baste for Moisture:
- Baste with drippings or butter every 30 minutes to enhance flavor and prevent dryness.
- Final Check:
- When the thermometer reads 165°F in the breast and 170°F–175°F in the thigh, remove the turkey from the oven.
Pro Tip: Let the turkey rest for 20–30 minutes after removing it from the oven. This allows the juices to redistribute, ensuring moist and tender meat.
By following these temperature and timing guidelines, and using the step-by-step process, you can achieve a perfectly cooked turkey in your convection oven that’s crispy on the outside and juicy on the inside.
Achieving Perfectly Crispy Skin
The Role of Butter and Oil
Butter and oil are essential for creating a golden, crispy turkey skin:
- Butter:
- Rubbing softened butter under and over the skin adds flavor and encourages browning.
- The milk solids in butter aid in caramelization, enhancing the color and crispness.
- Oil:
- Olive oil or vegetable oil brushed over the skin helps it crisp by promoting even browning without burning.
Pro Tip: Use a mixture of butter and oil for the best results, combining the rich flavor of butter with the high smoke point of oil.
Balancing Heat and Air Circulation
- High Heat at the Start:
- Start roasting at 400°F–425°F for the first 20–30 minutes to crisp the skin, then reduce to 325°F to cook the meat evenly.
- Proper Positioning:
- Elevate the turkey on a roasting rack to allow hot air to circulate beneath it, preventing soggy skin on the bottom.
- Avoid Overcrowding:
- Leave enough space in the oven for air to circulate freely around the turkey.
Tips for Avoiding Soggy Skin
- Dry the Turkey Thoroughly:
- Pat the turkey skin dry with paper towels before applying butter, oil, or seasoning.
- Avoid Basting the Skin Too Often:
- Frequent basting with broth or juices can make the skin soggy. Focus basting efforts on the meat instead.
- Use the Convection Feature:
- Convection ovens excel at circulating air, which helps to evaporate moisture from the skin.
Pro Tip: Let the turkey air-dry in the refrigerator overnight after seasoning to achieve extra-crispy skin.
Preventing Dry Meat
Importance of Basting
- Keeps Meat Moist:
- Basting the turkey with pan drippings, butter, or broth every 30 minutes helps keep the meat juicy.
- Adds Flavor:
- Basting with a seasoned mixture infuses the meat with additional flavors.
Pro Tip: Use a silicone brush or basting bulb for easy application without disturbing the skin too much.
Covering with Foil vs. Open Roasting
- Covering with Foil:
- Covering the turkey loosely with foil during the initial cooking period helps retain moisture and prevents the skin from over-browning.
- Remove the foil in the final 30–40 minutes to crisp the skin.
- Open Roasting:
- Leaving the turkey uncovered throughout allows for maximum crisping of the skin but requires more frequent basting to prevent dryness.
Pro Tip: A combination of both methods—covering early and uncovering later—provides the best results.
How to Rest the Turkey After Cooking
Resting the turkey is crucial for juicy, tender meat:
- Resting Time:
- Let the turkey rest for 20–30 minutes after removing it from the oven.
- Tent with Foil:
- Loosely tent the turkey with foil during resting to keep it warm while allowing the juices to redistribute throughout the meat.
- Carving Benefits:
- Resting makes the meat easier to carve and prevents the juices from spilling out when slicing.
Pro Tip: Avoid skipping the resting step—it ensures the meat stays juicy and flavorful.
By focusing on crisping the skin and preventing dryness through proper basting, covering, and resting techniques, you can achieve a perfectly roasted turkey that’s both crispy on the outside and tender on the inside.
FAQs About Cooking a Turkey in a Convection Oven
Is It Better to Cook a Turkey in a Convection Oven?
Yes, cooking a turkey in a convection oven is often considered better because:
- Even Heat Distribution:
- The circulating air ensures consistent cooking, resulting in evenly cooked meat and no undercooked sections.
- Faster Cooking Times:
- Convection ovens reduce cooking time by approximately 25% compared to conventional ovens.
- Crispy Skin:
- The fan in a convection oven removes surface moisture, making the skin golden and crispy while keeping the meat tender and juicy.
Pro Tip: Use a roasting rack in a convection oven to allow air to circulate around the entire turkey for optimal results.
How to Cook a Turkey in a Conventional Oven?
Cooking a turkey in a conventional oven involves the following steps:
- Preheat the Oven:
- Preheat to 325°F–350°F depending on your recipe.
- Prepare the Turkey:
- Season the turkey with butter, oil, or a dry rub and place it on a roasting rack inside a pan.
- Cooking Times:
- Unstuffed Turkey: Plan for 15 minutes per pound at 325°F.
- Stuffed Turkey: Allow an additional 30–45 minutes overall to ensure the stuffing reaches 165°F.
- Monitor Temperature:
- Use a meat thermometer to check for doneness:
- 165°F in the breast.
- 170°F–175°F in the thigh.
- Use a meat thermometer to check for doneness:
- Rest Before Carving:
- Let the turkey rest for 20–30 minutes before carving to retain its juices.
Pro Tip: Cover the turkey with foil if it browns too quickly and remove it for the final 30 minutes for crisp skin.
Is a Convection Oven Better for Roasting?
Yes, convection ovens are better for roasting due to their unique features:
- Even Cooking:
- Hot air circulation ensures consistent roasting without needing to rotate the food.
- Enhanced Texture:
- The convection process crisps the exterior while keeping the interior moist, ideal for meats and vegetables.
- Time Efficiency:
- Convection ovens cook food faster, saving time and energy.
Pro Tip: Reduce the oven temperature by 25°F when roasting in a convection oven to avoid overcooking.
Is It Better to Cook a Turkey at 325 or 350?
It depends on the desired results:
- 325°F:
- Best for slow roasting, allowing the turkey to cook evenly and remain moist.
- Ideal for larger turkeys that require longer cooking times.
- 350°F:
- Cooks the turkey faster and is suitable for smaller birds or if you’re short on time.
- Be cautious of over-browning; tent with foil if needed.
Pro Tip: For crispy skin and juicy meat, start at 400°F for 20–30 minutes, then reduce to 325°F for the remainder of the cooking time.
By understanding these guidelines, you can make informed decisions about cooking your turkey in a convection or conventional oven and achieve delicious, perfectly roasted results.
Some recipes you might want to see.
1 Burrata Nutrition: Facts You Need to Know
2 Recette Chutney Habanero: Epic Spicy Flavor