What Is an Ocean Cake?
Definition and Concept
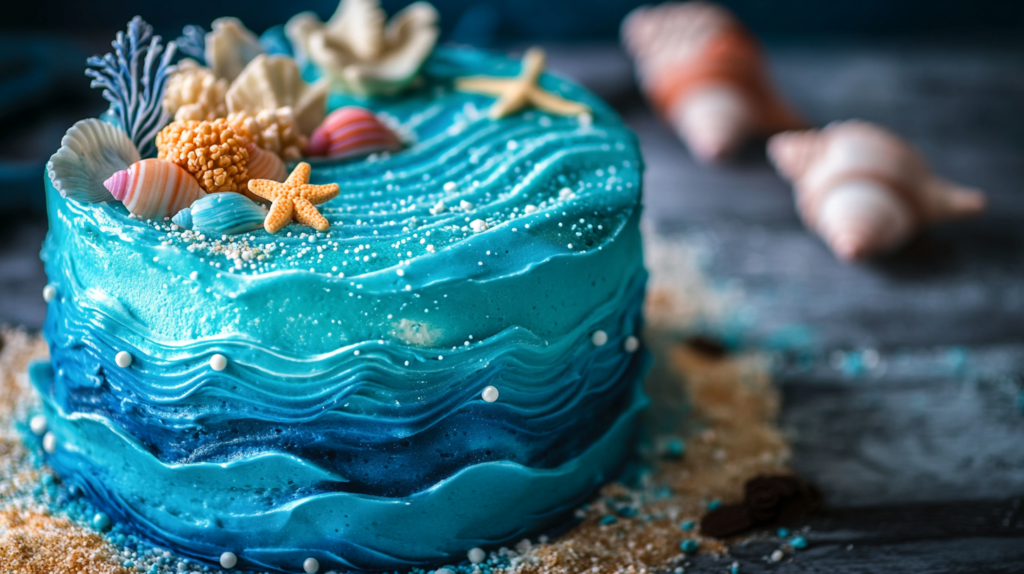
An ocean cake is a visually stunning dessert designed to capture the beauty and essence of the sea. Featuring elements like blue gradients, edible waves, sea creatures, and sandy textures, ocean cakes bring the aquatic world to life in a delicious and artistic form. These cakes often incorporate intricate decorations made with frosting, fondant, or edible toppers to mimic underwater scenes or beach-inspired themes.
Pro Tip: Ocean cakes are highly customizable, allowing you to tailor the design and flavors to suit the occasion.
Why Ocean Cakes Are Trending
Ocean cakes have gained popularity for their striking visuals and versatility. Social media platforms like Instagram and Pinterest have fueled the trend, with bakers showcasing elaborate ocean-themed designs that captivate audiences. The cake’s appeal lies in its ability to evoke a sense of wonder and nostalgia, making it a hit for all age groups.
Pro Tip: Metallic accents like gold or silver can elevate an ocean cake to a more sophisticated design.
Perfect Occasions for an Ocean-Themed Cake
- Birthdays:
- Ideal for ocean lovers or themed parties such as mermaids, pirates, or underwater adventures.
- Weddings:
- Elegant ocean cakes with minimalistic wave designs or beach-inspired elements are perfect for seaside ceremonies.
- Baby Showers:
- Ocean cakes featuring playful sea creatures or pastel waves make charming centerpieces.
Pro Tip: Match the cake’s flavor to the theme, such as tropical coconut or zesty lemon for a beachy vibe.
Inspiration Behind the Ocean Cake Theme
Significance of Ocean-Themed Desserts
Ocean-themed cakes often symbolize serenity, adventure, or a love for marine life. They allow bakers to express their creativity while paying homage to the beauty of the ocean. For many, these cakes represent happy memories of the beach, vacations, or time spent near the water.
Pro Tip: Incorporate edible elements like seashells or starfish to emphasize the ocean theme.
Popular Designs and Trends
- Wave Patterns:
- Achieved with buttercream or fondant, these designs mimic the movement of the ocean.
- Ombre Blue Layers:
- Gradual shades of blue create a visually striking effect, resembling the depths of the sea.
- Underwater Scenes:
- Decorate with edible coral, seaweed, and marine animals for a playful design.
Pro Tip: Use textured tools to add realism to wave patterns and underwater features.
Creative Ideas for Unique Touches
- Edible Sand:
- Use crushed cookies or graham crackers to create sandy textures around the base of the cake.
- Sea Glass Candy:
- Add translucent sugar candies that resemble sea glass for a whimsical touch.
- Lighting Effects:
- Incorporate LED lights to mimic the glow of underwater luminescence.
Pro Tip: Personalize the cake with a message or name written in a beach-style font for an extra-special touch.
Ocean cakes are not just desserts; they’re edible works of art that bring the magic of the sea to any celebration. Whether simple or elaborate, their beauty and symbolism make them a memorable centerpiece for a variety of occasions.
Ingredients Needed for an Ocean Cake
Basic Cake Ingredients
- Flour, Sugar, and Baking Powder:
- Form the foundation of your cake batter, ensuring a light and fluffy texture.
- Eggs, Butter, and Milk:
- Provide moisture, richness, and structure to the cake.
- Flavorings:
- Popular choices include vanilla, lemon, or tropical flavors like coconut and pineapple to match the ocean theme.
Pro Tip: For a colorful surprise, create ombre layers of blue or green cake batter to mimic the ocean when sliced.
Fondant and Edible Decorations
- Fondant:
- Use for creating smooth surfaces, waves, or sculpted sea-themed decorations like shells, starfish, and coral.
- Edible Decorations:
- Include sugar pearls for bubbles, candy seashells, and edible glitter for a shimmering water effect.
- Gelatin or Isomalt:
- Ideal for making realistic waves, translucent water effects, or sea glass.
Pro Tip: Mix fondant with tylose powder for added firmness when creating intricate decorations.
Coloring and Flavoring Options
- Food Coloring:
- Use gel-based food coloring in shades of blue, green, and white for a vibrant ocean look.
- Flavoring Extracts:
- Add flavors like coconut, rum, or citrus to complement the tropical theme.
- Edible Paints:
- Use for adding details, such as shading on waves or accents on decorations.
Pro Tip: Blend different shades of blue and white to create a realistic gradient effect on the cake’s surface.
Tools and Equipment for Decorating
Essential Baking Tools
- Mixing Bowls and Electric Mixer:
- For preparing a smooth and consistent cake batter.
- Cake Pans:
- Use round, square, or shaped pans depending on the desired ocean-themed design.
- Spatulas and Scrapers:
- Essential for frosting and smoothing cake surfaces.
Pro Tip: Use a rotating cake stand for easier frosting and decorating.
Specialized Tools for Sculpting and Painting
- Fondant Tools:
- Include sculpting tools, cutters, and molds for creating sea-themed decorations like shells and coral.
- Airbrush Kit:
- For adding realistic gradients and wave-like effects to the cake’s surface.
- Edible Paintbrushes:
- Use fine brushes for detailing small decorations and adding highlights.
Pro Tip: Invest in silicone molds shaped like sea creatures or shells for quick and professional-looking decorations.
Tips for Working with Fondant
- Keep It Covered:
- Fondant dries out quickly, so cover unused portions with plastic wrap while working.
- Smooth and Roll Evenly:
- Dust your work surface with cornstarch or powdered sugar to prevent sticking, and roll fondant evenly for a polished look.
- Secure Decorations:
- Use edible glue or royal icing to attach fondant pieces and ensure they stay in place.
Pro Tip: Chill the cake slightly before applying fondant to prevent sagging or tearing.
By combining high-quality ingredients, vibrant colors, and the right tools, you can create an ocean cake that’s not only delicious but also visually stunning. Whether simple or elaborate, your design will capture the magic of the sea.
Choosing the Right Cake Base
Flavor Options: Vanilla, Chocolate, or Fruit
- Vanilla:
- A classic and versatile choice that pairs well with most fillings and frostings. Add a hint of coconut or almond extract to give it a tropical twist.
- Chocolate:
- Rich and decadent, chocolate provides a bold flavor that complements an ocean theme, especially when paired with vibrant blue frosting.
- Fruit:
- Citrus flavors like lemon or orange, or tropical fruits like pineapple and mango, add a refreshing element to the cake.
Pro Tip: Match the cake flavor to the event’s theme or the preferences of your guests for a personalized touch.
Layering for Structural Support
- Thin Layers:
- Use thinner cake layers to make stacking and shaping easier, especially for intricate designs.
- Buttercream or Ganache:
- Apply a sturdy filling between layers to act as “glue” and provide stability.
Pro Tip: Use dowels or cake boards for added support if making a tall or tiered ocean cake.
Gluten-Free and Vegan Bases
- Gluten-Free Options:
- Use a gluten-free flour blend to create a moist and tender cake without sacrificing flavor or texture.
- Vegan Options:
- Replace eggs with flaxseed or applesauce, and use plant-based milk and butter substitutes to make the cake vegan-friendly.
Pro Tip: Adjust baking times slightly for alternative cake bases, as they may require more or less time than traditional recipes.
Preparing the Cake Layers
How to Bake Moist and Fluffy Layers
- Measure Ingredients Precisely:
- Accurate measurements are crucial for a perfect cake texture.
- Cream Butter and Sugar:
- Beat butter and sugar until light and fluffy to incorporate air, which helps the cake rise.
- Don’t Overmix:
- Mix just until the ingredients are combined to avoid a dense cake.
Pro Tip: Add sour cream or yogurt to the batter for extra moisture.
Cutting and Leveling for Even Assembly
- Cool Completely:
- Allow the cake layers to cool fully before cutting to prevent crumbling.
- Use a Serrated Knife or Leveler:
- Trim domed tops for flat, even layers that stack neatly.
- Mark and Trim:
- Lightly mark the cutting line before trimming to ensure precision.
Pro Tip: Save the trimmed cake scraps to make cake pops or use them as edible sand for decorations.
Freezing for Easier Handling
- Wrap Layers Individually:
- Wrap cooled cake layers in plastic wrap to retain moisture and prevent freezer burn.
- Freeze for 30 Minutes to 1 Hour:
- Slightly frozen layers are firmer and easier to handle during assembly and decoration.
- Thaw Gradually:
- Let the layers sit at room temperature for a few minutes before frosting.
Pro Tip: Freezing also enhances flavor, as it allows the cake to absorb moisture evenly.
By selecting the right cake base and preparing the layers carefully, you’ll create a solid foundation for your ocean cake. These steps ensure the cake is both visually impressive and deliciously satisfying.
Making the Ocean-Themed Frosting
Achieving a Realistic Water Effect
- Base Color:
- Use a mix of blue gel food coloring to create a vibrant water-like hue. Add a touch of green for a more tropical look.
- Texture:
- Use a spatula to create gentle swirls or peaks in the frosting, mimicking the movement of water.
- Layering:
- Blend lighter and darker shades of blue to add depth and dimension to the “water.”
Pro Tip: Use clear piping gel for added shine and a wet, glossy water effect.
Gradient Coloring Techniques
- Prepare Multiple Shades:
- Divide your frosting into separate bowls and add varying amounts of blue food coloring to create gradients from light to dark.
- Layer the Colors:
- Start with the darkest shade at the bottom of the cake and work upward with lighter shades, blending gently where they meet.
- Smooth the Transition:
- Use an offset spatula or icing scraper to smooth the layers and create a seamless ombre effect.
Pro Tip: Add white frosting streaks to mimic foam or crashing waves.
Adding Shimmer with Edible Glitter
- Sprinkle Edible Glitter:
- Apply edible glitter or luster dust over the frosting to give the “water” a sparkling, sunlit appearance.
- Focus on Details:
- Highlight areas like wave peaks or edges to make the shimmer look natural.
Pro Tip: Use a fine paintbrush to apply luster dust precisely for a polished effect.
Step-by-Step Guide to Decorating an Ocean Cake
Applying the Base Frosting
- Crumb Coat:
- Apply a thin layer of frosting to seal in crumbs and create a smooth base for decoration. Chill the cake for 15 minutes.
- Final Coat:
- Spread the ocean-colored frosting evenly across the cake, ensuring full coverage.
Pro Tip: Use a cake turntable to make the application smoother and more efficient.
Creating Waves with Piping Techniques
- Piping Waves:
- Use a round or star tip to pipe frosting in wavy, overlapping patterns around the cake.
- Blending:
- Use a spatula or spoon to gently blend the edges of the waves for a natural look.
- Details:
- Add white frosting accents to the tips of waves to mimic foam or surf.
Pro Tip: Add piping gel over the waves for a glossy, water-like finish.
Adding Beach Elements Like Sand and Seashells
- Edible Sand:
- Sprinkle crushed cookies, graham crackers, or brown sugar around the base of the cake to create a sandy beach.
- Seashells and Coral:
- Use fondant molds or chocolate molds to create edible seashells, starfish, and coral. Paint them with edible metallic or pearlescent colors for realism.
- Toppers and Figurines:
- Add themed toppers like mermaids, fish, or ships for extra flair.
Pro Tip: Scatter sugar pearls or candy gems around the cake for added detail and underwater sparkle.
By crafting ocean-themed frosting and using creative decorating techniques, you can transform your cake into a stunning underwater masterpiece. The combination of gradient colors, shimmering effects, and thoughtful details will make your ocean cake a show-stopping centerpiece.
Some recipes you might want to see.
1 White Chocolate Ganache: Easy Recipe for Perfection


